
Driving Example with VR Steering Wheel.
Driving Example 1: Set up the scene for Keyboard Control.
Instead of creating all my own assets for this, we decided to use some free assets from the Asset Store, that you will need to download and install to allow this example to work.
If you wish to use other assets (Race track, Vehicle) you may need to check that the vehicle is rigged correctly (wheel colliders, etc) and that the track has all the correct mesh colliders. However, other assets should work equally as well as the ones I have used, which are:
- Mountain race tracks: https://assetstore.unity.com/packages/3d/environments/landscapes/mountain-race-tracks-110408#publisher
- Realistic Buggy Kit: https://assetstore.unity.com/packages/tools/physics/realistic-buggy-kit-62978#description
Once you have imported these, the example scene should open correctly. We have used the Mobile version of the Buggy (from Prefab/Vehicles), as a Quest is basically an Android phone. We have also unpacked the Prefab so we can make changes to it that only apply to each example.
Note: To use the Buggy Actions and Alternate script, you will need to expand the Unity Package in the Scripts Folder. Then you need to REPLACE the original script with this one. Do not just DISABLE the original, as you will have issues.
Next, we Hide/Deleted the barriers to the track and the Lampposts, as the Buggy is an Off-Road vehicle, and there were no colliders on the barriers anyway.
As the Buggy has a Rigid Body, you must start it above the above and allow it to fall. Otherwise it will bounce off wildly in a random direction. I have also created two tags, Street and Grass, and added them to the z0_ and Terrain respectively, as the Buggy control has these set. Otherwise, you can just delete them from the Buggy Control Script.
The Buggy already has all the basic vehicle controls, so I am going to skip that for now, and we will cover how to add wheel colliders, torque, etc, in another tutorial. But sometimes it is easier just to use a rigged vehicle, as you would usually use a fully rigged character for you player model.
The Player starts as Third Person/Adventure Camera, and then changes to First person as he mounts the Buggy. However, feel free to be in either and any time as both will work. You can even experiment with Hands Only, simply by changing the FPS model to the Hands Only Model.
I have created 2 camera Motors, the Adventure Camera for outside of the vehicle, and the First Person for inside. For the First Person, I have set head bobbing to 0 and dropped the offset to 1.4 so the Camera fits inside the buggy.
The Player starts as Third Person/Adventure Camera, and then changes to First person as he mounts the Buggy. However, feel free to be in either and any time as both will work. You can even experiment with Hands Only, simply by changing the FPS model to the Hands Only Model.
We have created 2 camera Motors, the Adventure Camera for outside of the vehicle, and the First Person for inside. For the First Person, we have set head bobbing to 0 and dropped the offset to 1.4 so the Camera fits inside the buggy.
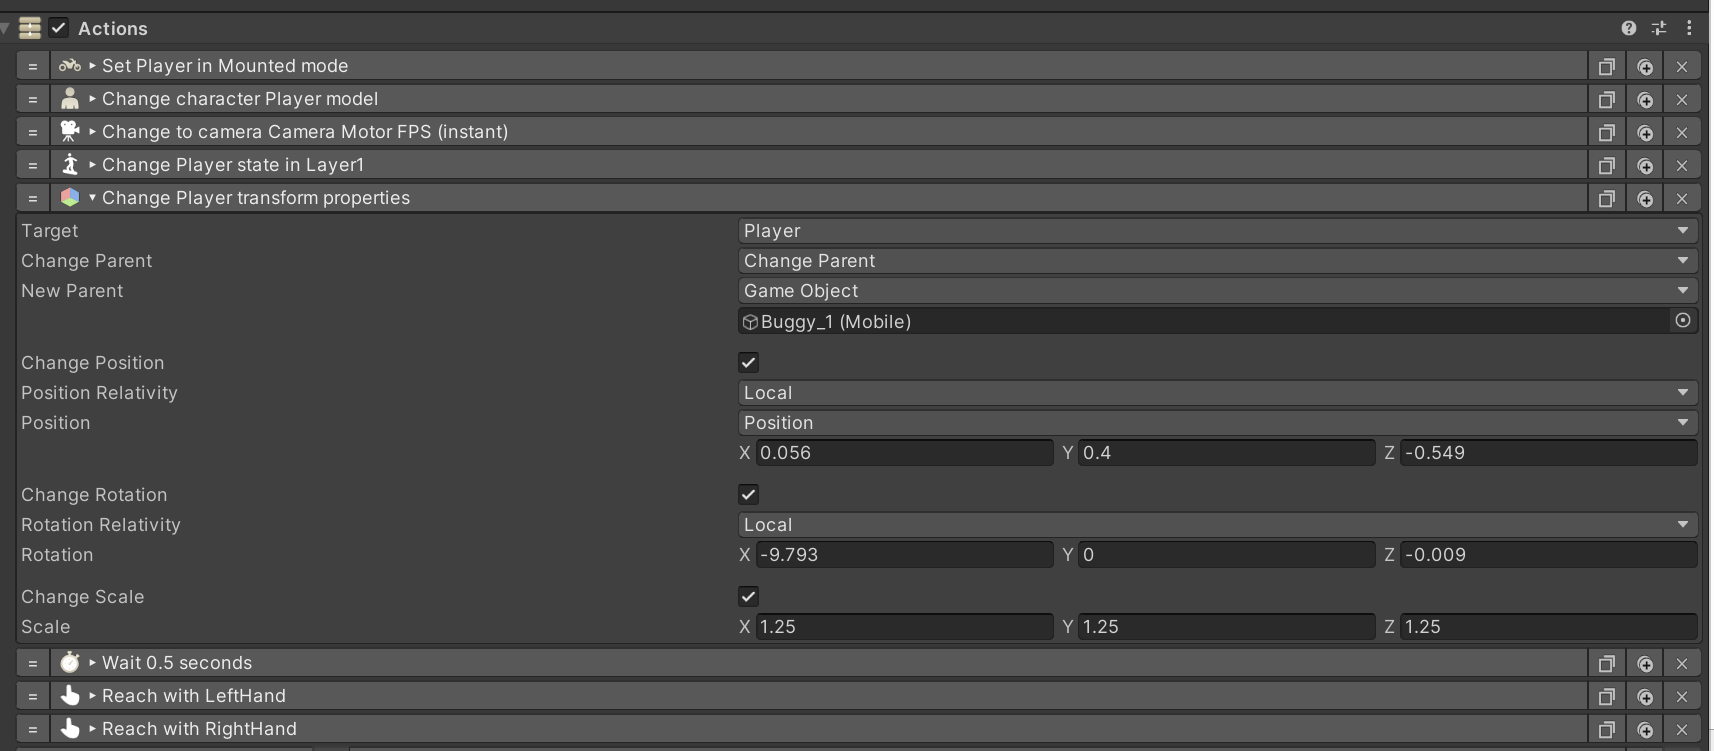
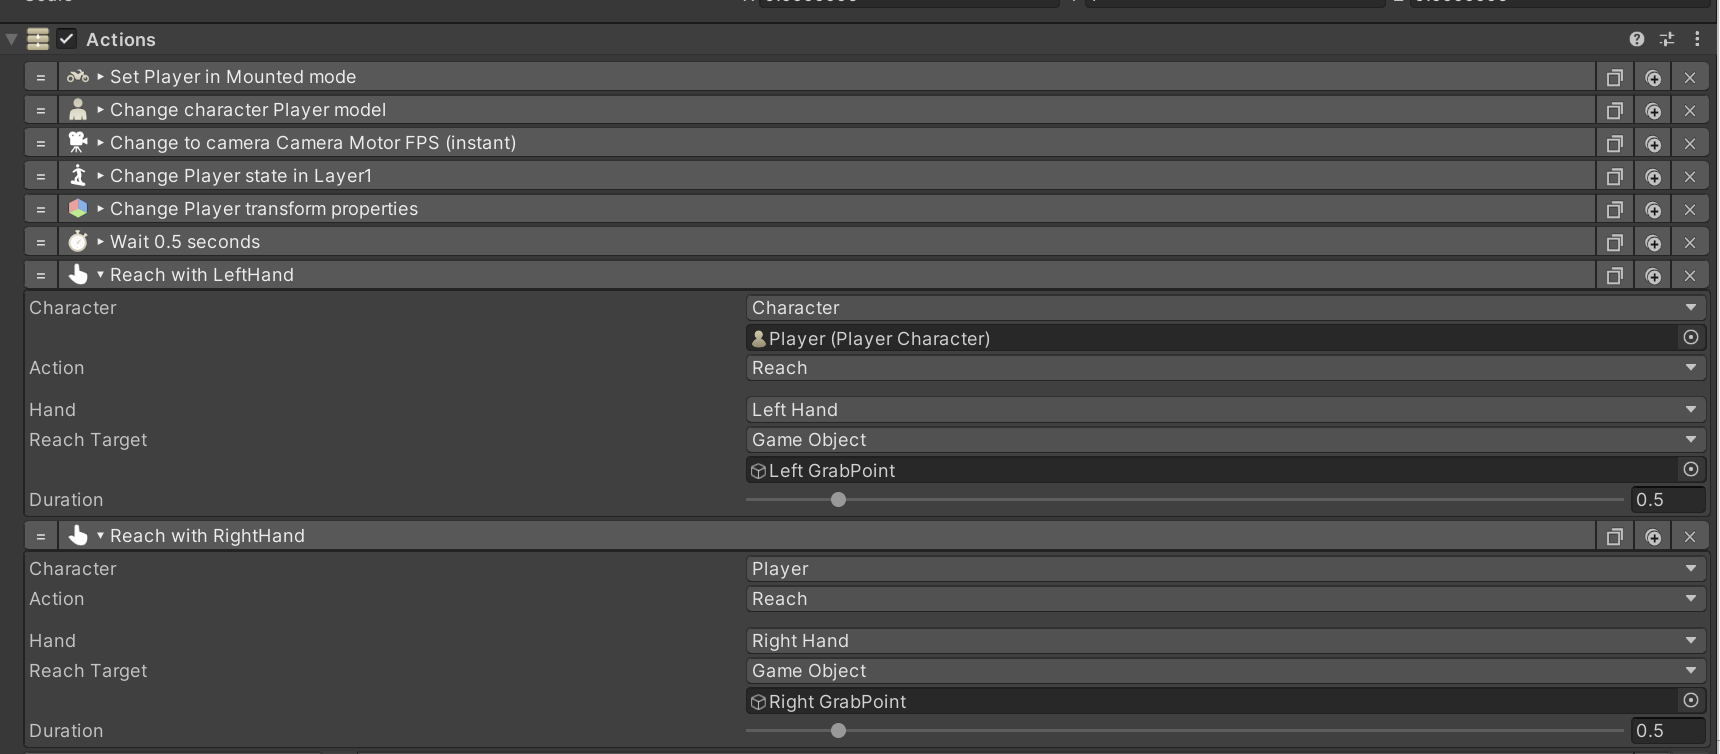
The next things was to create a Trigger for entering the buggy. I will not go over every step, you can see this in the example. However, the player must be put in Mounted mode, and parented to the Buggy, otherwise the Buggy will drive off without the Player. I have included a sitting state, moved and rotated the player, scaled to 1.25 to match the Buggy, and change to First Person Model and Camera. This is all done with standard GC Actions, including moving the hands to the steering wheel. I created a Left and Right grab point in addition to the ones already there, but they are just empty game objects. I did move the Left Gizmo slightly, as the grab was a bit offset. Check the example to see what I have done. After entering the Buggy, the Left and Right Player Hands reach for these game objects. You could use the existing ones for this example, but we will be making changes to them in the next example.
I have created a simple Action to start the Buggy (set it Active) and placed this on a Key down Trigger, alpha 1. From here, you can drive the buggy (good luck) with the keyboard. You should test this before going further and adding the VR components. I have saved this scene as Driving Example 1. The Camera motion could need some work, perhaps even swap to a fixed camera on the Buggy, but that is outside the scope of this example for VR.
Driving Example 2: Add VR with Thumbstick Car Control.
For Driving Example 2, we have added the XRRig and XRManager to the scene. The Main Camera should be set Inactive, and the FPS Camera Motor add to the Camera Controller on the XRRig. Next, change the Player Model to the FPS model. If you wish, you can have third person until you enter the Buggy, if so, leave the model and cameras as they are.
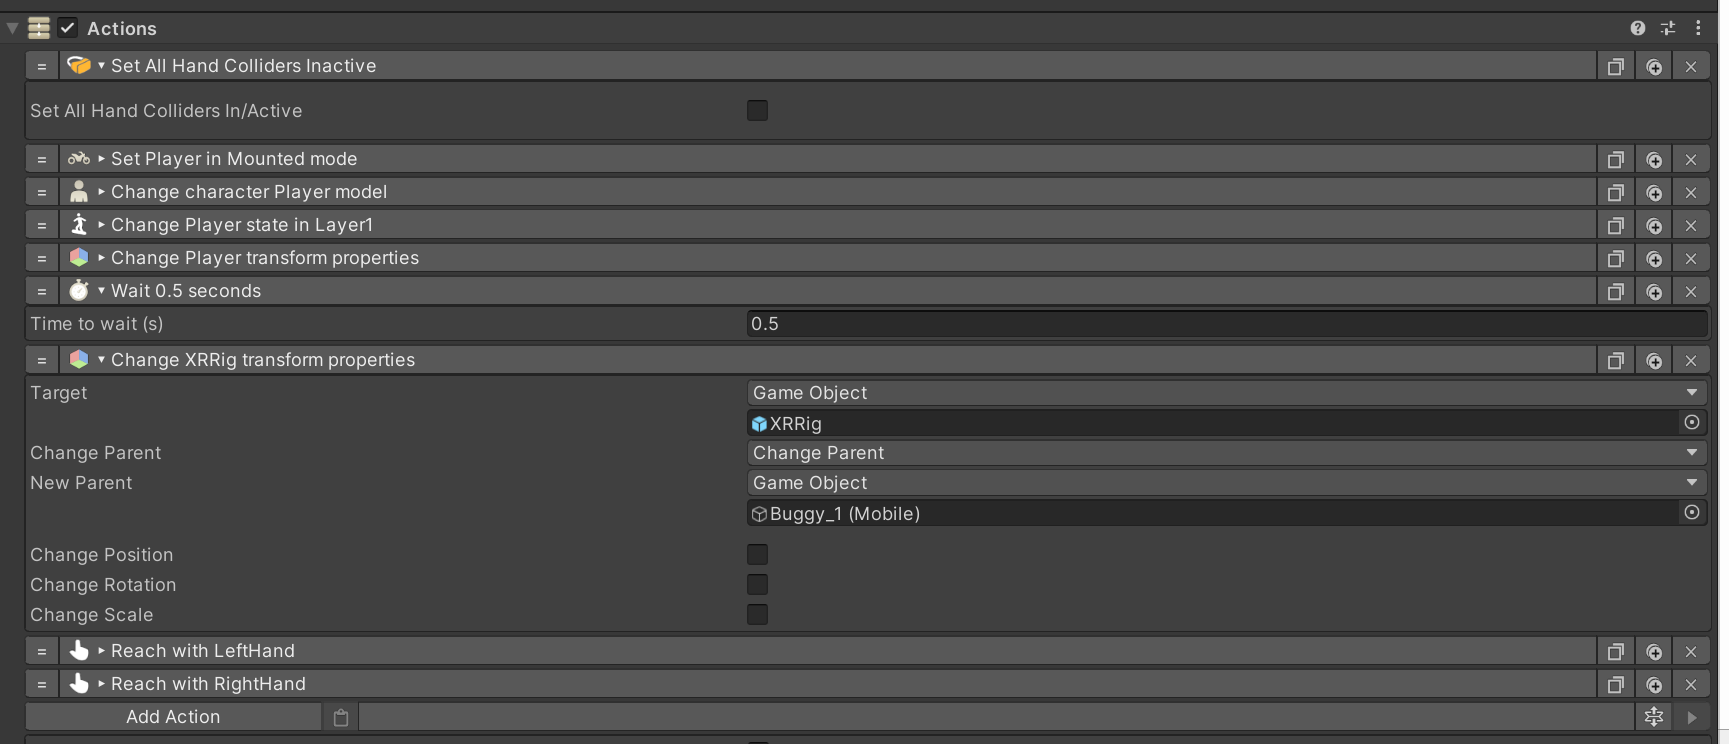
There are two additional Actions that need to be added. First, in the Enter Buggy Actions, add the Set All Hand Colliders Inactive before the Character enters the vehicle. Secondly, add the Movement Controller to an On Start trigger, after a 0.5 second wait.
Lastly, drag the Start Buggy Action to a Hand Controller button of your choice. I added it to Button 1 on the Right Hand (A).
Either build for you Android, or start the Airlink (or Link with Cable) and play in the Editor. You can drive with the Left Thumbstick, and I have set the Right Thumbstick to rotate the Camera with a 45 degree snap. You can play with additional camera settings if you want to stay with this scene. I suggest that you also parent the XRRig to the Buggy in the Enter Buggy Action Stream, as this will always have you looking forward in the vehicle. However, if you suffer from motion sickness as I do, I leave this step out and control the camera with the Thumbstick.
Driving Example 3: Add VR Hand Car Control.
Now for the heavy stuff. First we add a Reset Basic IK Action to the end of the Enter Buggy Actions stream. Also you must parent the XRRig AND the XRManager to the Buggy in the Enter Buggy Action Stream otherwise you will have issues with the Rigid Body.
We also must check the Arm IK While Moving check box on the Character Movement settings that we added at stage 2. This will allow the arms to be moved while the Buggy is in motion. Remove the to Actions that have the hands reach for the Steering Wheel, and in the Change Player State, add a lower Body Mask, so that only the Lower body will take the seated Pose for Driving.

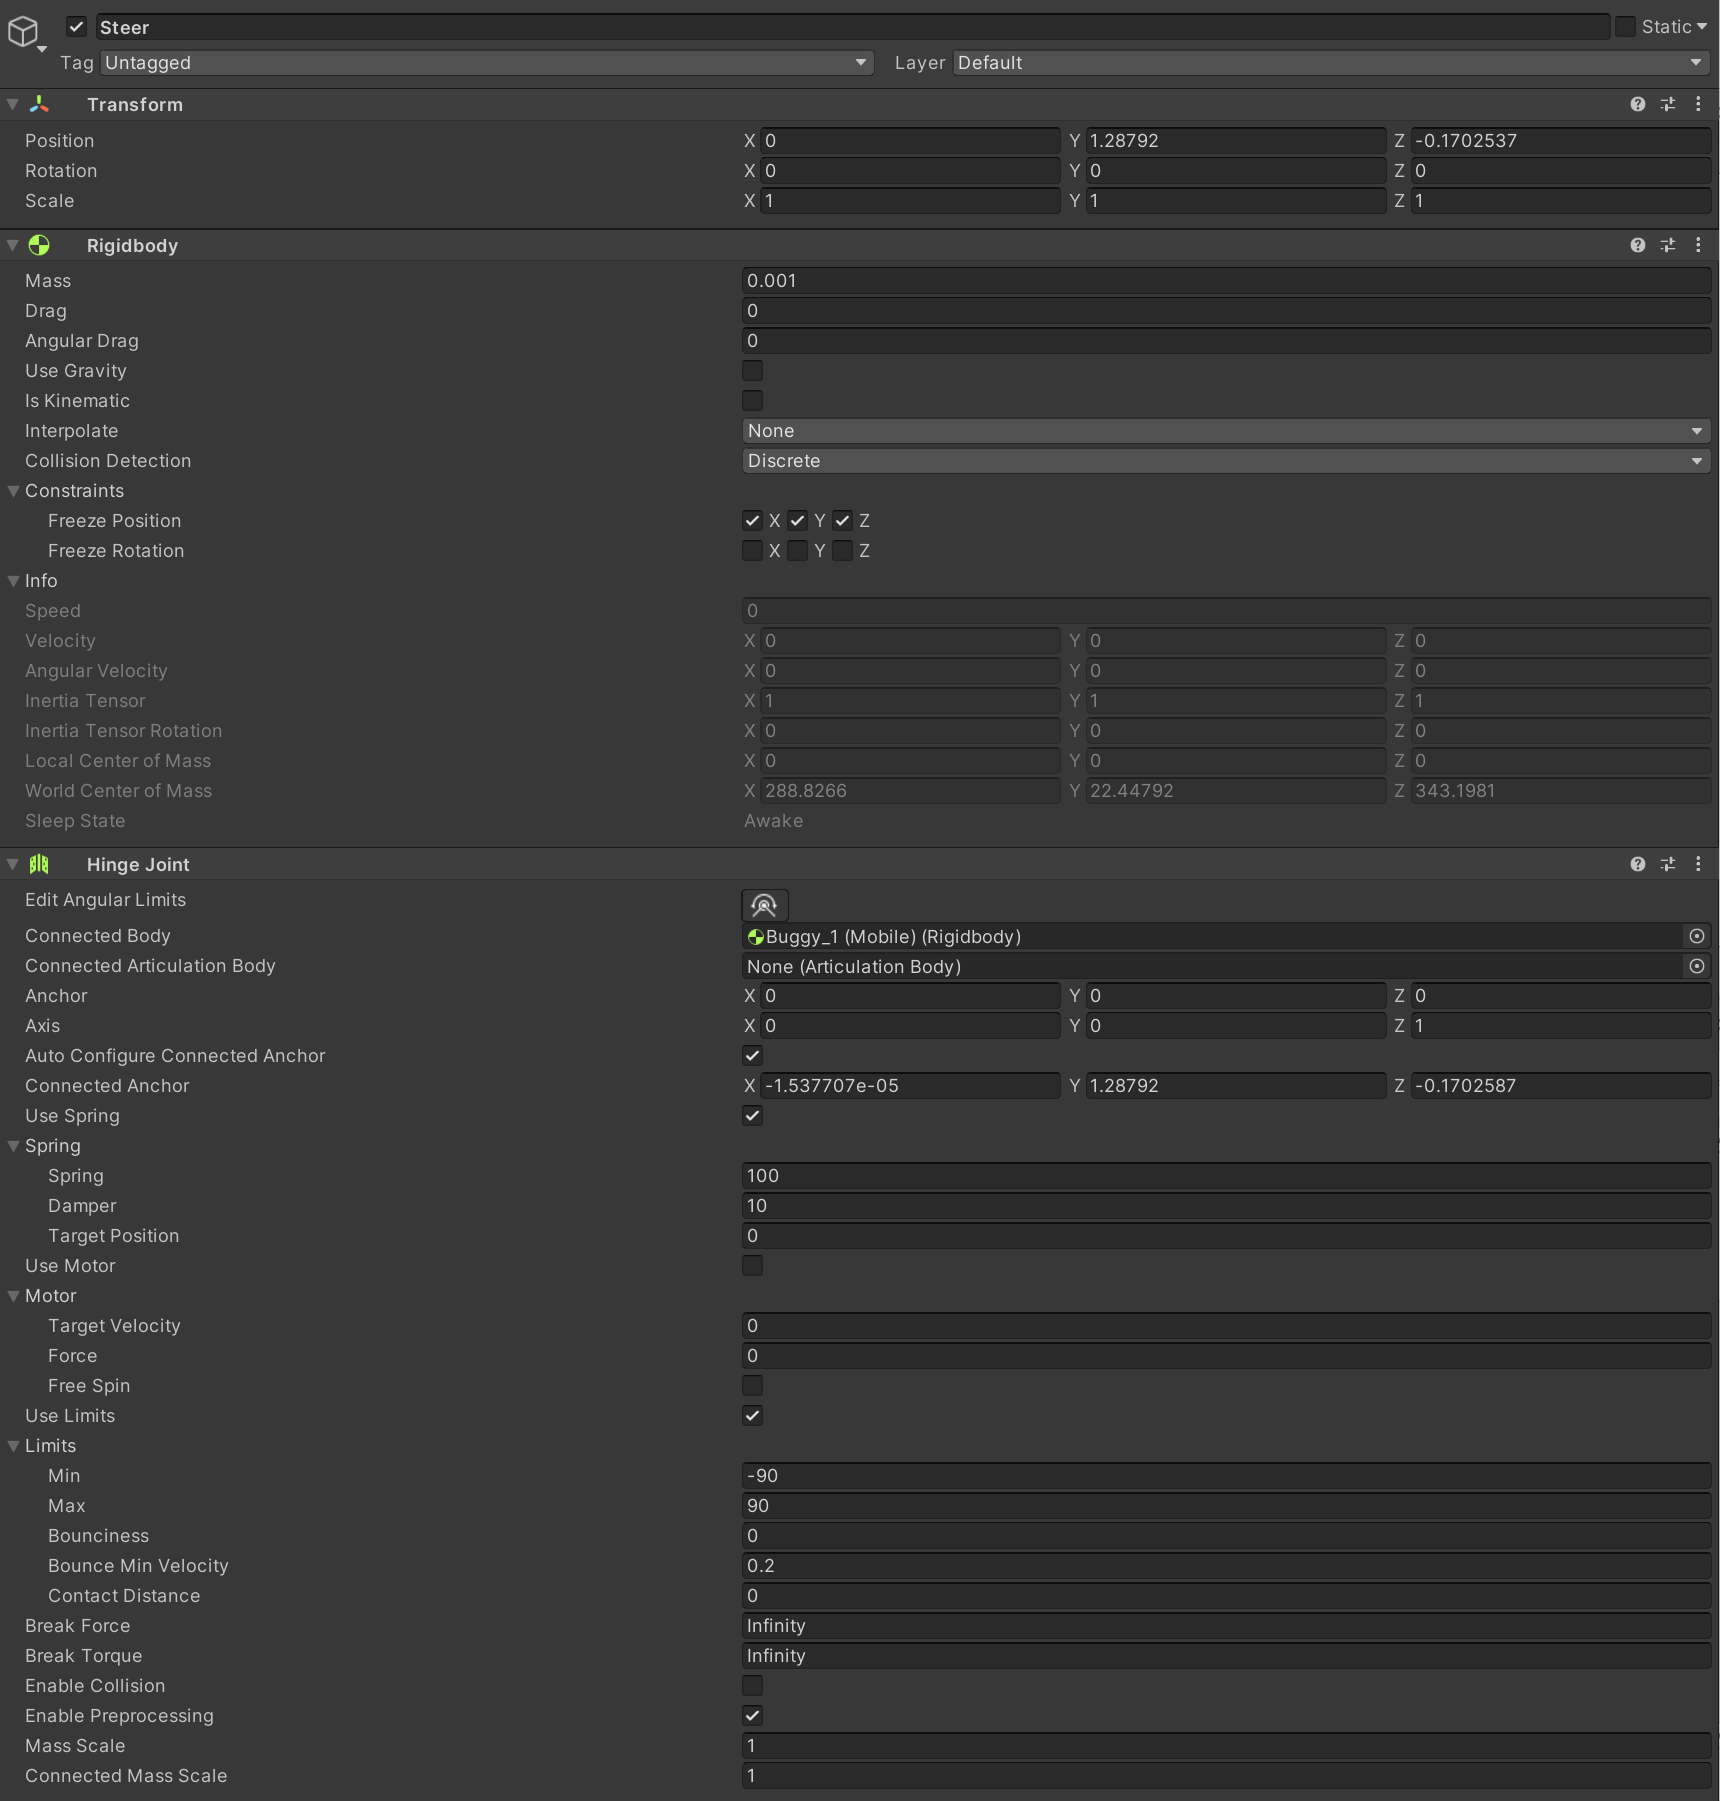
The Buggy now needs to be set up for VR. Locate the Steering wheel (it is named steer in this asset) and add a rigid body with the Constraints of Freeze Position X, Y, and Z. Also change the Mass to 0.001, the angular drag to 0, and uncheck the Use Gravity. Next, add a Hinge Joint, adding the Buggy model to the Connected Body parameter, and most importantly, set the Axis to Z and not the default X. You can play with the different settings. I have added a Spring and Damper, so the Steering will attempt to centre as it does in a real car, and I have limited the turning from -90 to 90 degrees.
Now we add a Rigid Body to each of the grab points (we will use the already defined Left and Right Gizmos for this part), a fixed joint with the Steering Wheel as the connected body. For the Rigid Body change the Mass to 0.001, the angular drag to 0, and uncheck the Use Gravity.
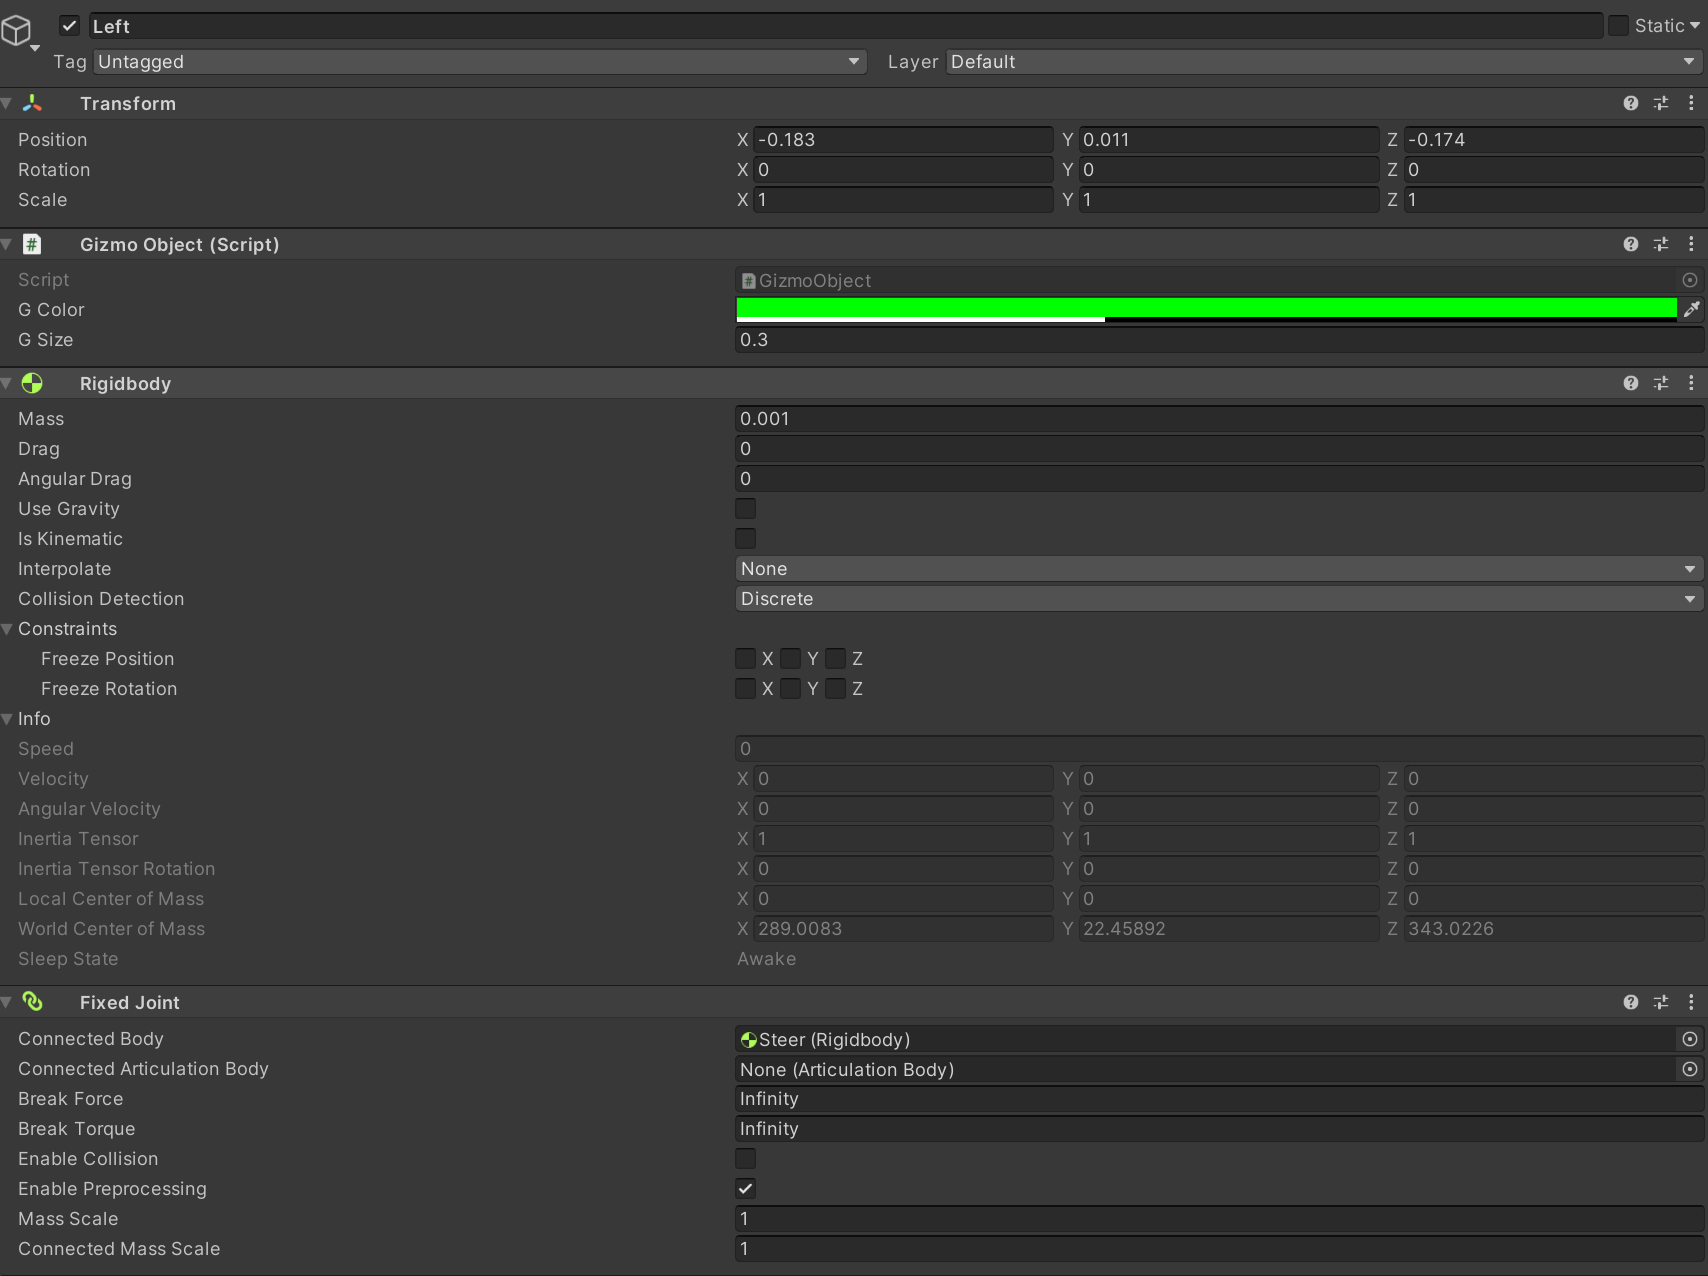
Then we need Actions to Grab the wheel when we press the hand controller grips. This is where we use the extra Left and Right Grab Points that we added, without RBs attached. The two Actions we use for each hand are to Attach the Hand Control to the Rigid Body (use the Game Object name Right for Right, Left for Left), and then change the Hand Follower to the extra Grab Point that we added. We do it this way, as there are issues trying to follow a grab point with a Rigid Body.
Set the Grip Actions to Grab when pressed, and release when released.

Finally, we have created a new Buggy Control Script for VR, as it is far easier to just replace the existing one than try to amend it. If you are adding all of this from the start instead of using the preconfigured example, you will need to add all the parameters as per the example setting.
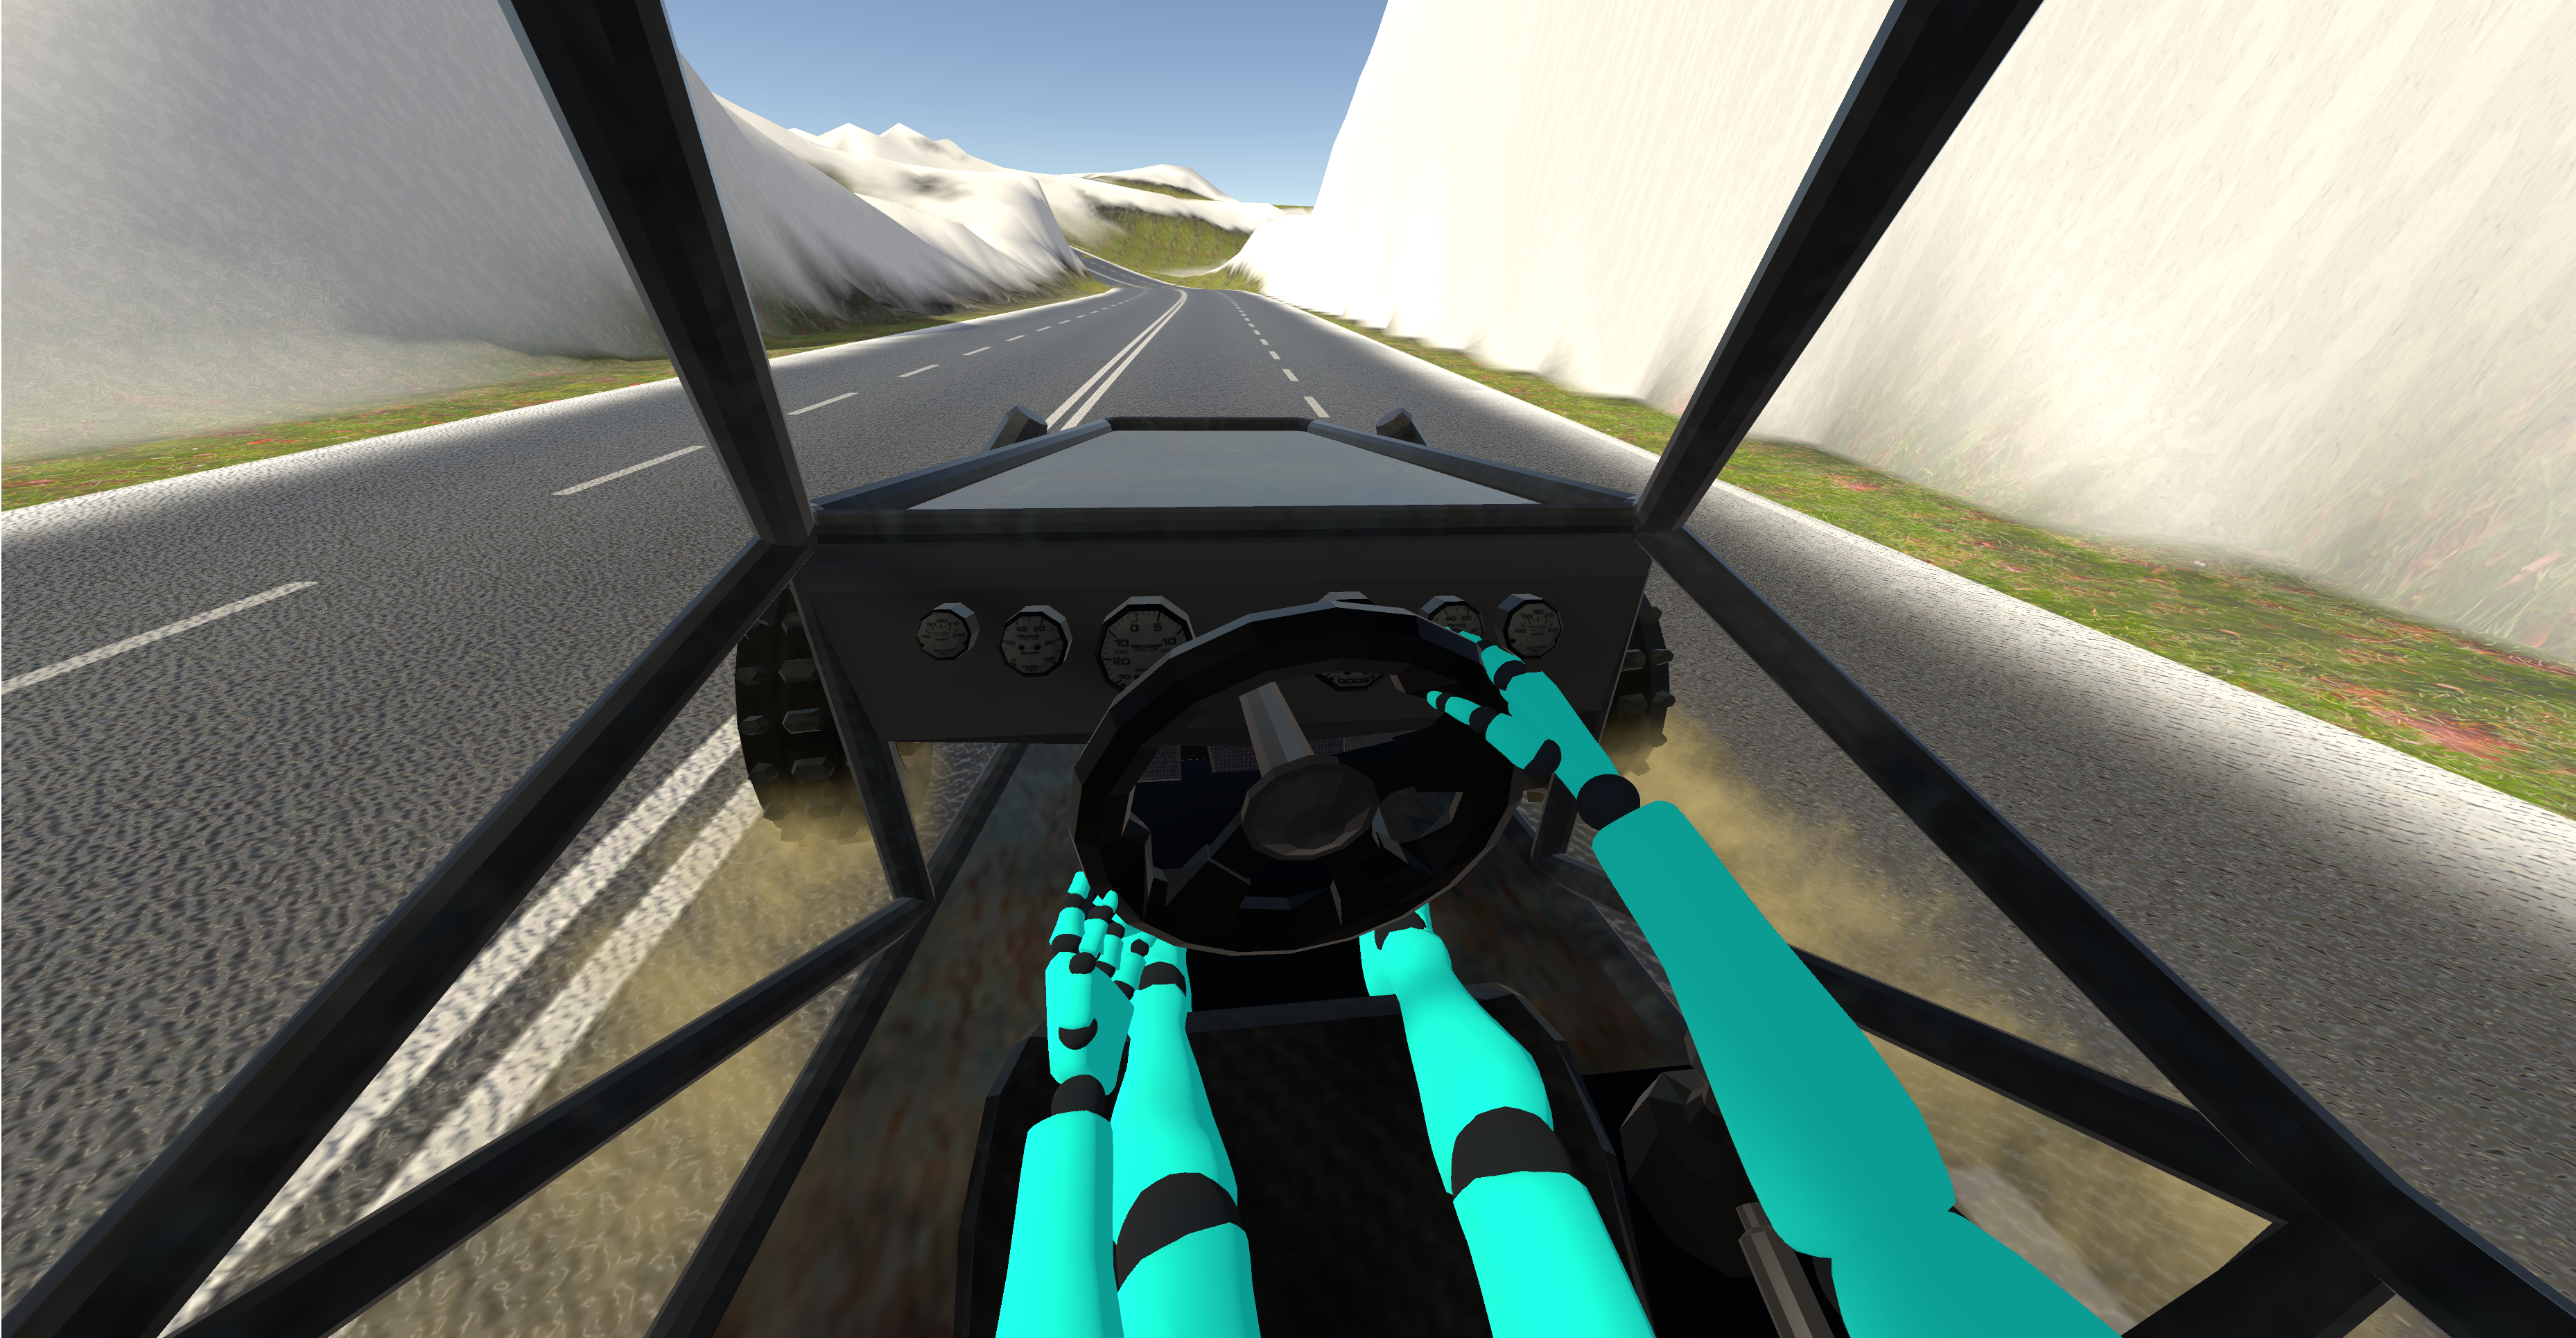
All now should work, unless we have missed something, put the headset on, move to the buggy, grab the wheel, and start with the A button.
Useful Links
Pivec Labs |
||
|
||
|
||
|
||
|
|
|
Since |
2005 |
|
Awards |
||
Website |
||
|
|
|
|
|
|
|
||
ALL RIGHTS RESERVED © 2022 |
||
